在 Kubernetes 中搭建 Harbor
前言
Harbor 是一个开源且安全的容器镜像仓库,支持基于 RBAC 的访问权限控制,容器镜像漏洞扫描和镜像签名等安全特性。同时支持管理 Docker 镜像和 Helm Charts Repository,使开发者可以高效便捷且安全地管理各种云原生平台的镜像。
本次搭建的整体思路是利用阿里云 Kubernetes 集群搭建一个 Harbor 镜像仓库和 Helm Charts 仓库,通过 Secret 存储管理页面 SSL 证书,存储方面使用阿里云 NAS 服务挂载 Persistence Volume,并对应定义好 Persistence Volume Claim。由于 Kubernetes 集群内已存在 Ingress 服务,故使用已有的 Ingress 服务代理 Harbor,由 Ingress + TLS 向外提供服务,Ingress 到 Harbor 服务则无需 TLS。
搭建环境
本次搭建过程基于阿里云 Kubernetes 托管版集群环境进行,如需在本地 Docker 下进行实验,可参考这篇文章,具体情况如下:
- 本地 Docker Engine => 19.03.8
- 阿里云 Kubernetes => v1.16.6
- Helm => v3.2.1
关于 Helm 的安装过程和使用请参考 Helm
准备工作
申请 HTTPS 证书,并通过以下命令生成加密好的字符串:
cat ca.crt | base64
cat public.crt | base64
cat private.key | base64
将生成好的三段加密字符串填入 Secret 配置文件,配置如下:
apiVersion: v1
kind: Secret
metadata:
  name: sc-harbor-test-com-ssl
  namespace: devops
data:
  ca.crt: (第一段,CA 证书)
  tls.crt: (第二段,TLS 证书公钥)
  tls.key: (第三段,TLS 证书密钥)
type: kubernetes.io/tls
接着我们需要准备一个 NAS 存储卷。阿里云 NAS 分为如下几种类型,这里我们选择通用型即可。
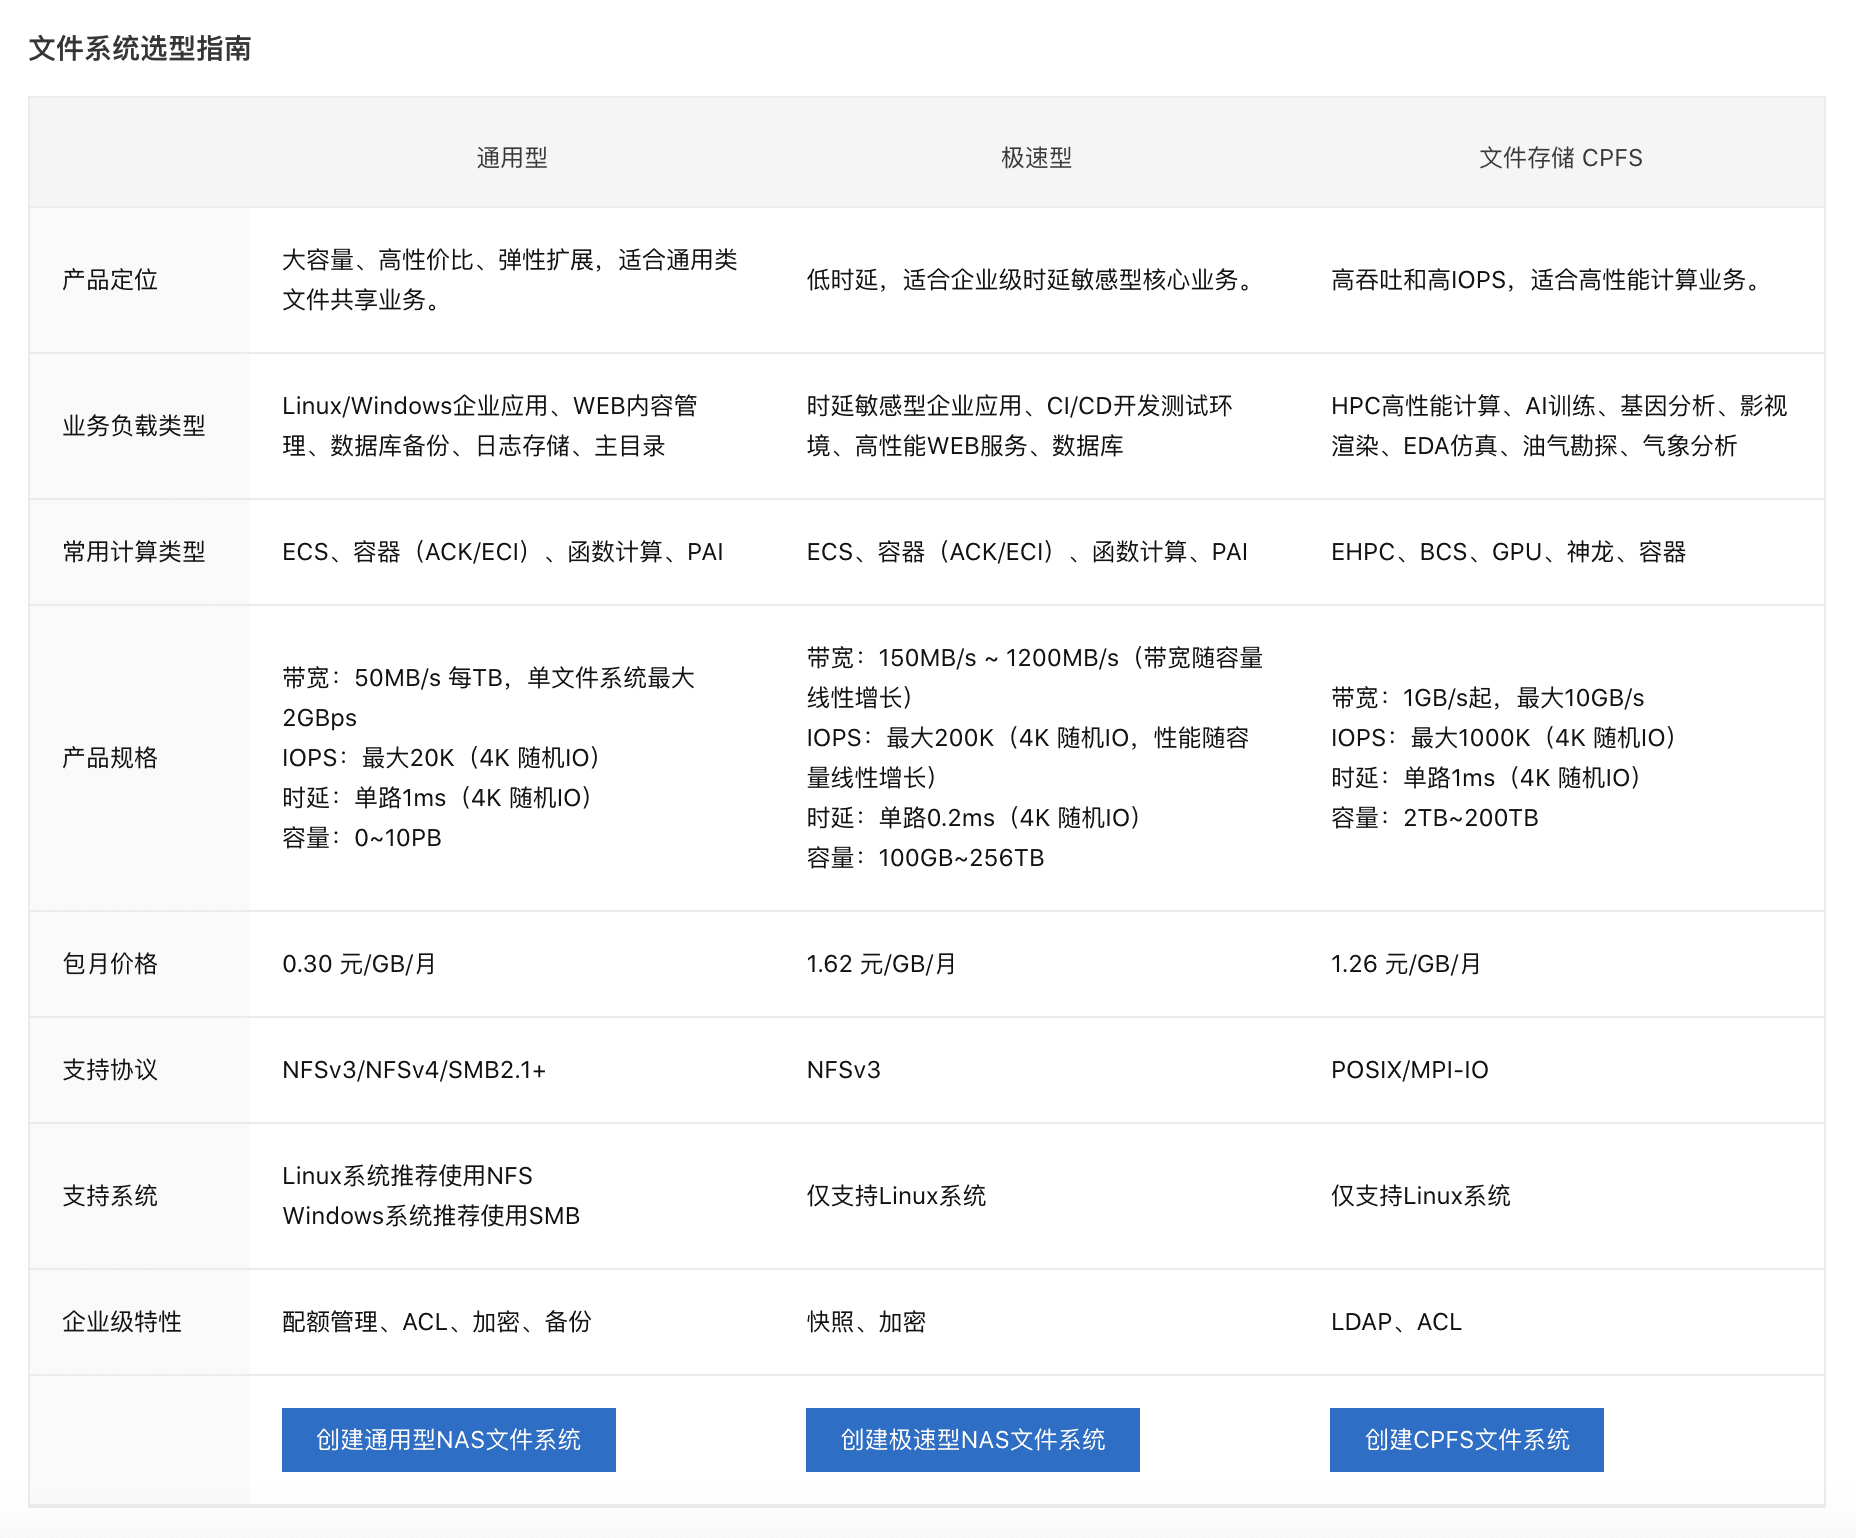
在阿里云 NAS 文件系统管理面板创建一个 NAS 卷,选择离服务器最近的可用区,并设置好 VPC 内权限,默认创建好后会有一个挂载点。

创建好 NAS 后,点击进入创建好的 NAS 管理面板,进入挂载点面板查看挂载点地址。

现在我们需要编写一个 Kubernetes Persistence Volume 的配置文件,并将上面创建的 NAS 地址填入配置文件,配置可参考如下:
apiVersion: v1
kind: PersistentVolume
metadata:
  name: pv-devops-harbar
  namespace: devops
spec:
  capacity:
    storage: 100Gi
  accessModes:
    - ReadWriteMany
  persistentVolumeReclaimPolicy: Retain
  csi:
    driver: nasplugin.csi.alibabacloud.com
    volumeAttributes:
      path: /devops/harbor
      server: 79b32xxx.ap-southeast-1.nas.aliyuncs.com (NAS 地址)
      vers: '3'
    volumeHandle: pv-devops-harbor
  storageClassName: nas-devops-harbor
  volumeMode: Filesystem
注意:此处使用了子目录 /devops/harbor 来定义 PV,而非根目录,因此挂载前需要确认该 NAS 下已存在该子目录,否则会挂载失败。可以使用 ECS 服务器挂载后在 NAS 中创建目录,但需要注意属主权限问题,否则可能会遇到 Harbor 无法创建目录导致的镜像推送失败问题。Harbor Repository 目录属主默认为 10000:10000,Harbor Database 目录属主默认为 999:999。
接下来我们需要对应编写 Kubernetes Persistence Volume Claim 配置文件。
kind: PersistentVolumeClaim
apiVersion: v1
metadata:
  name: pvc-devops-harbor
  namespace: devops
spec:
  accessModes:
    - ReadWriteMany
  storageClassName: nas-devops-harbor (需与 PV 中 storageClassName 一致)
  resources:
    requests:
      storage: 100Gi
  volumeMode: Filesystem
因为由 Ingress 来代理 Harbor 服务,因此还需要准备 Ingress 的配置文件,同时将域名解析到 Ingress 上,并在配置文件中填入刚刚定义证书的 Secret 名称,以开启 TLS。
apiVersion: extensions/v1beta1
kind: Ingress
metadata:
  name: devops-ingress
  namespace: devops
  annotations:
    ingress.kubernetes.io/ssl-redirect: "true"
    ingress.kubernetes.io/proxy-body-size: "0"
    nginx.ingress.kubernetes.io/ssl-redirect: "true"
    nginx.ingress.kubernetes.io/proxy-body-size: "0"
spec:
  tls:
  - hosts:
    - harbor.test.com
    secretName: sc-harbor-test-com-ssl (TLS 证书 Secret 名称)
  rules:
    - host: harbor.test.com
      http:
        paths:
        - path: /
          backend:
            serviceName: svc-devops-harbor
            servicePort: 80
编写好以上四个文件后,通过 kubectl 将其应用到 Kubernetes 集群上。
现在我们通过 GitHub 下载 Harbor Chart 包到本地:前往 GitHub。下载后解压,修改 Harbor Chart 中 values.yaml 文件参数来改变部署配置:
expose:
  # 设置暴露服务的方式。将类型设置为 ingress、clusterIP或nodePort并补充对应部分的信息。
  # 本地测试可采用绑定主机端口的方式进行服务暴露,因为集群已有Ingress,通过手动配置Ingress方式,故使用ClusterIP暴露,如果需要通过Harbor来配合Ingress可使用Ingress。
  # 部署在集群中根据情况采用 Ingress 或者 LoadBalancer 方式暴露
  type: clusterIP
  tls:
    # 是否开启 tls,注意:如果类型是 ingress 并且tls被禁用,则在pull/push镜像时,则必须包含端口
    # 本地测试可不开启 TLS, 线上环境无前置代理建议开启,由于集群内已有Ingress处理TLS,Harbor本身不需要TLS,所以不开启。
    enabled: false
    # 若需要使用自己的证书则需要在此填入对应 TLS Secret 资源名称, TLS Secret 生成请参考
    secretName: ""
    # 若暴露方式为 Ingress 且 Notory 服务需要使用单独的证书时填入对应 TLS Secret 资源名称
    notarySecretName: ""
    # common name 是用于生成证书的,当暴露类型不为 Ingress 且 secretName 为空的时候才需要
  ingress:
    hosts:
      core: harbor.test.com
      notary: notary.harbor.test.com
    # set to the type of ingress controller if it has specific requirements.
    # leave as `default` for most ingress controllers.
    # set to `gce` if using the GCE ingress controller
    # set to `ncp` if using the NCP (NSX-T Container Plugin) ingress controller
    controller: default
    annotations:
      ingress.kubernetes.io/ssl-redirect: "true"
      ingress.kubernetes.io/proxy-body-size: "0"
      nginx.ingress.kubernetes.io/ssl-redirect: "true"
      nginx.ingress.kubernetes.io/proxy-body-size: "0"
  clusterIP:
    # ClusterIP 服务名
    name: svc-devops-harbor
    ports:
      httpPort: 80
      httpsPort: 443
      notaryPort: 4443
  nodePort:
    # NodePort 服务名
    name: harbor
    ports:
      http:
        # 容器 HTTP 开放端口
        port: 80
        # 宿主机 HTTP 映射端口
        nodePort: 30002
      https:
        # 容器 HTTPS 开放端口
        port: 443
        # 宿主机 HTTPS 映射端口
        nodePort: 30003
      notary:
        # Notary 服务监听端口
        port: 4443
        # 宿主机 Notary 服务映射端口
        nodePort: 30004
  loadBalancer:
    # LoadBalancer 服务名
    name: harbor
    # 设置 LoadBalancer 绑定的 IP
    IP: ""
    # 相关服务端口开放
    ports:
      httpPort: 80
      httpsPort: 443
      notaryPort: 4443
    annotations: {}
    sourceRanges: []

# Harbor 核心服务外部访问 URL。主要用于:
# 1) 补全 portal 页面上面显示的 docker/helm 命令
# 2) 补全返回给 docker/notary 客户端的 token 服务 URL

# 格式:protocol://domain[:port]。
# 1) 如果 expose.type=ingress,"domain"的值就是 expose.ingress.hosts.core 的值
# 2) 如果 expose.type=clusterIP,"domain"的值就是 expose.clusterIP.name 的值
# 3) 如果 expose.type=nodePort,"domain"的值就是 k8s 节点的 IP 地址
# 如果在代理后面部署 Harbor,请将其设置为代理的 URL
# 本地环境可使用回环地址,线上环境按实际情况填写
externalURL: https://harbor.test.com

# The internal TLS used for harbor components secure communicating. In order to enable https
# in each components tls cert files need to provided in advance.
internalTLS:
  # If internal TLS enabled
  enabled: false
  # There are three ways to provide tls
  # 1) "auto" will generate cert automatically
  # 2) "manual" need provide cert file manually in following value
  # 3) "secret" internal certificates from secret
  certSource: "auto"
  # The content of trust ca, only available when `certSource` is "manual"
  trustCa: ""
  # core related cert configuration
  core:
    # secret name for core's tls certs
    secretName: ""
    # Content of core's TLS cert file, only available when `certSource` is "manual"
    crt: ""
    # Content of core's TLS key file, only available when `certSource` is "manual"
    key: ""
  # jobservice related cert configuration
  jobservice:
    # secret name for jobservice's tls certs
    secretName: ""
    # Content of jobservice's TLS key file, only available when `certSource` is "manual"
    crt: ""
    # Content of jobservice's TLS key file, only available when `certSource` is "manual"
    key: ""
  # registry related cert configuration
  registry:
    # secret name for registry's tls certs
    secretName: ""
    # Content of registry's TLS key file, only available when `certSource` is "manual"
    crt: ""
    # Content of registry's TLS key file, only available when `certSource` is "manual"
    key: ""
  # portal related cert configuration
  portal:
    # secret name for portal's tls certs
    secretName: ""
    # Content of portal's TLS key file, only available when `certSource` is "manual"
    crt: ""
    # Content of portal's TLS key file, only available when `certSource` is "manual"
    key: ""
  # chartmuseum related cert configuration
  chartmuseum:
    # secret name for chartmuseum's tls certs
    secretName: ""
    # Content of chartmuseum's TLS key file, only available when `certSource` is "manual"
    crt: ""
    # Content of chartmuseum's TLS key file, only available when `certSource` is "manual"
    key: ""
  # clair related cert configuration
  clair:
    # secret name for clair's tls certs
    secretName: ""
    # Content of clair's TLS key file, only available when `certSource` is "manual"
    crt: ""
    # Content of clair's TLS key file, only available when `certSource` is "manual"
    key: ""
  # trivy related cert configuration
  trivy:
    # secret name for trivy's tls certs
    secretName: ""
    # Content of trivy's TLS key file, only available when `certSource` is "manual"
    crt: ""
    # Content of trivy's TLS key file, only available when `certSource` is "manual"
    key: ""

# 默认情况下开启数据持久化,在k8s集群中需要动态的挂载卷默认需要一个StorageClass对象。
# 如果你有已经存在可以使用的持久卷,需要在"storageClass"中指定你的 storageClass 或者设置 "existingClaim"。
#
# 对于存储 docker 镜像和 Helm charts 包,你也可以用 "azure"、"gcs"、"s3"、"swift" 或者 "oss",直接在 "imageChartStorage" 区域设置即可
persistence:
  enabled: true
  # 设置成"keep"避免在执行 helm 删除操作期间移除 PVC,留空则在 chart 被删除后删除 PVC
  resourcePolicy: "keep"
  persistentVolumeClaim:
    registry:
      # 使用一个存在的 PVC (必须在绑定前先手动创建)
      # 与其它组件共享 PVC 时请指定子路径分隔
      existingClaim: "pvc-devops-harbor"
      # 指定"storageClass",或者使用默认的 StorageClass 对象,设置成"-"禁用动态分配挂载卷
      storageClass: "-"
      subPath: "registry"
      accessMode: ReadWriteOnce
      size: 10Gi
    chartmuseum:
      existingClaim: "pvc-devops-harbor"
      storageClass: "-"
      subPath: "chartmuseum"
      accessMode: ReadWriteOnce
      size: 10Gi
    jobservice:
      existingClaim: "pvc-devops-harbor"
      storageClass: "-"
      subPath: "jobservice"
      accessMode: ReadWriteOnce
      size: 2Gi
    # 若使用外部数据库服务,以下设置将被忽略
    database:
      existingClaim: "pvc-devops-harbor"
      storageClass: "-"
      subPath: "database"
      accessMode: ReadWriteOnce
      size: 2Gi
    # 若使用外部 Redis 服务,以下设置将被忽略
    redis:
      existingClaim: "pvc-devops-harbor"
      storageClass: "-"
      subPath: "redis"
      accessMode: ReadWriteOnce
      size: 2Gi
    trivy:
      existingClaim: "pvc-devops-harbor"
      storageClass: "-"
      subPath: "trivy"
      accessMode: ReadWriteOnce
      size: 10Gi
  # 定义使用什么存储后端来存储镜像和 Charts 包,详细文档地址:https://github.com/docker/distribution/blob/master/docs/configuration.md#storage
  imageChartStorage:
    # 对镜像和 Chart 存储是否禁用跳转,对于一些不支持的后端(例如对于使用minio 的 s3 存储),需要禁用它。为了禁止跳转,只需要设置 disableredirect=true 即可,详细文档地址:https://github.com/docker/distribution/blob/master/docs/configuration.md#redirect
    disableredirect: false
    # 存储服务使用自签名证书时需要指定 caBundleSecretName
    # caBundleSecretName:

    # 指定存储类型:"filesystem", "azure", "gcs", "s3", "swift", "oss",在相应的区域填上对应的信息。
    # 如果你想使用 pv 则必须设置成"filesystem"类型
    # 本地测试故使用 filesystem 类型,路径为先前创建的目录方便管理,线上环境根据实际情况选择
    type: filesystem
    filesystem:
      rootdirectory: /storage
      #maxthreads: 100
    azure:
      accountname: accountname
      accountkey: base64encodedaccountkey
      container: containername
      #realm: core.windows.net
    gcs:
      bucket: bucketname
      # The base64 encoded json file which contains the key
      encodedkey: base64-encoded-json-key-file
      #rootdirectory: /gcs/object/name/prefix
      #chunksize: "5242880"
    s3:
      region: us-west-1
      bucket: bucketname
      #accesskey: awsaccesskey
      #secretkey: awssecretkey
      #regionendpoint: http://myobjects.local
      #encrypt: false
      #keyid: mykeyid
      #secure: true
      #v4auth: true
      #chunksize: "5242880"
      #rootdirectory: /s3/object/name/prefix
      #storageclass: STANDARD
    swift:
      authurl: https://storage.myprovider.com/v3/auth
      username: username
      password: password
      container: containername
      #region: fr
      #tenant: tenantname
      #tenantid: tenantid
      #domain: domainname
      #domainid: domainid
      #trustid: trustid
      #insecureskipverify: false
      #chunksize: 5M
      #prefix:
      #secretkey: secretkey
      #accesskey: accesskey
      #authversion: 3
      #endpointtype: public
      #tempurlcontainerkey: false
      #tempurlmethods:
    oss:
      accesskeyid: accesskeyid
      accesskeysecret: accesskeysecret
      region: regionname
      bucket: bucketname
      #endpoint: endpoint
      #internal: false
      #encrypt: false
      #secure: true
      #chunksize: 10M
      #rootdirectory: rootdirectory
# 组件镜像拉取规则
imagePullPolicy: IfNotPresent

# 用于预先设置镜像拉取 Secret
imagePullSecrets:
#  - name: docker-registry-secret
#  - name: internal-registry-secret

# 针对绑定了 PV 的 Deployments 的容器更新规则(jobservice, registry and chartmuseum): "RollingUpdate(滚动更新)" or "Recreate(重新床创建)。"Recreate" 方式不支持 "RWM" 类型的卷存储
updateStrategy:
  type: RollingUpdate

# 日志登记
logLevel: info

# Harbor admin 管理员初始密码
harborAdminPassword: "Harbor12345"
# 用于加密的一个 secret key,必须是一个16位的字符串
secretKey: "1234567890123456"

# 用于更新 Clair 漏洞库的代理设置
proxy:
  httpProxy:
  httpsProxy:
  noProxy: 127.0.0.1,localhost,.local,.internal
  components:
    - core
    - jobservice
    - clair

# 下面为 Harbor 相关组件的设置,暂不需要定制其设置

## UAA Authentication Options
# If you're using UAA for authentication behind a self-signed
# certificate you will need to provide the CA Cert.
# Set uaaSecretName below to provide a pre-created secret that
# contains a base64 encoded CA Certificate named `ca.crt`.
# uaaSecretName:

# 若暴露方式为 "Ingress",下列的 Nginx 将不被使用
nginx:
  image:
    repository: goharbor/nginx-photon
    tag: v2.0.0
  replicas: 1
  # resources:
  #  requests:
  #    memory: 256Mi
  #    cpu: 100m
  nodeSelector: {}
  tolerations: []
  affinity: {}
  ## Additional deployment annotations
  podAnnotations: {}

portal:
  image:
    repository: goharbor/harbor-portal
    tag: v2.0.0
  replicas: 1
# resources:
#  requests:
#    memory: 256Mi
#    cpu: 100m
  nodeSelector: {}
  tolerations: []
  affinity: {}
  ## Additional deployment annotations
  podAnnotations: {}

core:
  image:
    repository: goharbor/harbor-core
    tag: v2.0.0
  replicas: 1
  ## Liveness probe values
  livenessProbe:
    initialDelaySeconds: 300
# resources:
#  requests:
#    memory: 256Mi
#    cpu: 100m
  nodeSelector: {}
  tolerations: []
  affinity: {}
  ## Additional deployment annotations
  podAnnotations: {}
  # Secret is used when core server communicates with other components.
  # If a secret key is not specified, Helm will generate one.
  # Must be a string of 16 chars.
  secret: ""
  # Fill the name of a kubernetes secret if you want to use your own
  # TLS certificate and private key for token encryption/decryption.
  # The secret must contain keys named:
  # "tls.crt" - the certificate
  # "tls.key" - the private key
  # The default key pair will be used if it isn't set
  secretName: ""
  # The XSRF key. Will be generated automatically if it isn't specified
  xsrfKey: ""

jobservice:
  image:
    repository: goharbor/harbor-jobservice
    tag: v2.0.0
  replicas: 1
  maxJobWorkers: 10
  # The logger for jobs: "file", "database" or "stdout"
  jobLogger: file
# resources:
#   requests:
#     memory: 256Mi
#     cpu: 100m
  nodeSelector: {}
  tolerations: []
  affinity: {}
  ## Additional deployment annotations
  podAnnotations: {}
  # Secret is used when job service communicates with other components.
  # If a secret key is not specified, Helm will generate one.
  # Must be a string of 16 chars.
  secret: ""

registry:
  registry:
    image:
      repository: goharbor/registry-photon
      tag: v2.0.0

    # resources:
    #  requests:
    #    memory: 256Mi
    #    cpu: 100m
  controller:
    image:
      repository: goharbor/harbor-registryctl
      tag: v2.0.0

    # resources:
    #  requests:
    #    memory: 256Mi
    #    cpu: 100m
  replicas: 1
  nodeSelector: {}
  tolerations: []
  affinity: {}
  ## Additional deployment annotations
  podAnnotations: {}
  # Secret is used to secure the upload state from client
  # and registry storage backend.
  # See: https://github.com/docker/distribution/blob/master/docs/configuration.md#http
  # If a secret key is not specified, Helm will generate one.
  # Must be a string of 16 chars.
  secret: ""
  # If true, the registry returns relative URLs in Location headers. The client is responsible for resolving the correct URL.
  relativeurls: true
  credentials:
    username: "harbor_registry_user"
    password: "harbor_registry_password"
    # If you update the username or password of registry, make sure use cli tool htpasswd to generate the bcrypt hash
    # e.g. "htpasswd -nbBC10 $username $password"
    htpasswd: "harbor_registry_user:$2y$10$9L4Tc0DJbFFMB6RdSCunrOpTHdwhid4ktBJmLD00bYgqkkGOvll3m"

  middleware:
    enabled: false
    type: cloudFront
    cloudFront:
      baseurl: example.cloudfront.net
      keypairid: KEYPAIRID
      duration: 3000s
      ipfilteredby: none
      # The secret key that should be present is CLOUDFRONT_KEY_DATA, which should be the encoded private key
      # that allows access to CloudFront
      privateKeySecret: "my-secret"

chartmuseum:
  enabled: true
  # Harbor defaults ChartMuseum to returning relative urls, if you want using absolute url you should enable it by change the following value to 'true'
  absoluteUrl: false
  image:
    repository: goharbor/chartmuseum-photon
    tag: v2.0.0
  replicas: 1
  # resources:
  #  requests:
  #    memory: 256Mi
  #    cpu: 100m
  nodeSelector: {}
  tolerations: []
  affinity: {}
  ## Additional deployment annotations
  podAnnotations: {}

clair:
  enabled: false
  clair:
    image:
      repository: goharbor/clair-photon
      tag: v2.0.0
    # resources:
    #  requests:
    #    memory: 256Mi
    #    cpu: 100m
  adapter:
    image:
      repository: goharbor/clair-adapter-photon
      tag: v2.0.0
    # resources:
    #  requests:
    #    memory: 256Mi
    #    cpu: 100m
  replicas: 1
  # The interval of clair updaters, the unit is hour, set to 0 to
  # disable the updaters
  updatersInterval: 12
  nodeSelector: {}
  tolerations: []
  affinity: {}
  ## Additional deployment annotations
  podAnnotations: {}

trivy:
  # enabled the flag to enable Trivy scanner
  enabled: false
  image:
    # repository the repository for Trivy adapter image
    repository: goharbor/trivy-adapter-photon
    # tag the tag for Trivy adapter image
    tag: v2.0.0
  # replicas the number of Pod replicas
  replicas: 1
  # debugMode the flag to enable Trivy debug mode with more verbose scanning log
  debugMode: false
  # vulnType a comma-separated list of vulnerability types. Possible values are `os` and `library`.
  vulnType: "os,library"
  # severity a comma-separated list of severities to be checked
  severity: "UNKNOWN,LOW,MEDIUM,HIGH,CRITICAL"
  # ignoreUnfixed the flag to display only fixed vulnerabilities
  ignoreUnfixed: false
  # insecure the flag to skip verifying registry certificate
  insecure: false
  # gitHubToken the GitHub access token to download Trivy DB
  #
  # Trivy DB contains vulnerability information from NVD, Red Hat, and many other upstream vulnerability databases.
  # It is downloaded by Trivy from the GitHub release page https://github.com/aquasecurity/trivy-db/releases and cached
  # in the local file system (`/home/scanner/.cache/trivy/db/trivy.db`). In addition, the database contains the update
  # timestamp so Trivy can detect whether it should download a newer version from the Internet or use the cached one.
  # Currently, the database is updated every 12 hours and published as a new release to GitHub.
  #
  # Anonymous downloads from GitHub are subject to the limit of 60 requests per hour. Normally such rate limit is enough
  # for production operations. If, for any reason, it's not enough, you could increase the rate limit to 5000
  # requests per hour by specifying the GitHub access token. For more details on GitHub rate limiting please consult
  # https://developer.github.com/v3/#rate-limiting
  #
  # You can create a GitHub token by following the instructions in
  # https://help.github.com/en/github/authenticating-to-github/creating-a-personal-access-token-for-the-command-line
  gitHubToken: ""
  # skipUpdate the flag to disable Trivy DB downloads from GitHub
  #
  # You might want to set the value of this flag to `true` in test or CI/CD environments to avoid GitHub rate limiting issues.
  # If the value is set to `true` you have to manually download the `trivy.db` file and mount it in the
  # `/home/scanner/.cache/trivy/db/trivy.db` path.
  skipUpdate: false
  resources:
    requests:
      cpu: 200m
      memory: 512Mi
    limits:
      cpu: 1
      memory: 1Gi
  ## Additional deployment annotations
  podAnnotations: {}

notary:
  enabled: true
  server:
    image:
      repository: goharbor/notary-server-photon
      tag: v2.0.0
    replicas: 1
    # resources:
    #  requests:
    #    memory: 256Mi
    #    cpu: 100m
  signer:
    image:
      repository: goharbor/notary-signer-photon
      tag: v2.0.0
    replicas: 1
    # resources:
    #  requests:
    #    memory: 256Mi
    #    cpu: 100m
  nodeSelector: {}
  tolerations: []
  affinity: {}
  ## Additional deployment annotations
  podAnnotations: {}
  # Fill the name of a kubernetes secret if you want to use your own
  # TLS certificate authority, certificate and private key for notary
  # communications.
  # The secret must contain keys named ca.crt, tls.crt and tls.key that
  # contain the CA, certificate and private key.
  # They will be generated if not set.
  secretName: ""

database:
  # if external database is used, set "type" to "external"
  # and fill the connection informations in "external" section
  type: internal
  internal:
    image:
      repository: goharbor/harbor-db
      tag: v2.0.0
    # the image used by the init container
    initContainerImage:
      repository: busybox
      tag: latest
    # The initial superuser password for internal database
    password: "changeit"
    # resources:
    #  requests:
    #    memory: 256Mi
    #    cpu: 100m
    nodeSelector: {}
    tolerations: []
    affinity: {}
  external:
    host: "192.168.0.1"
    port: "5432"
    username: "user"
    password: "password"
    coreDatabase: "registry"
    clairDatabase: "clair"
    notaryServerDatabase: "notary_server"
    notarySignerDatabase: "notary_signer"
    # "disable" - No SSL
    # "require" - Always SSL (skip verification)
    # "verify-ca" - Always SSL (verify that the certificate presented by the
    # server was signed by a trusted CA)
    # "verify-full" - Always SSL (verify that the certification presented by the
    # server was signed by a trusted CA and the server host name matches the one
    # in the certificate)
    sslmode: "disable"
  # The maximum number of connections in the idle connection pool.
  # If it <=0, no idle connections are retained.
  maxIdleConns: 50
  # The maximum number of open connections to the database.
  # If it <= 0, then there is no limit on the number of open connections.
  # Note: the default number of connections is 100 for postgre.
  maxOpenConns: 100
  ## Additional deployment annotations
  podAnnotations: {}

redis:
  # if external Redis is used, set "type" to "external"
  # and fill the connection informations in "external" section
  type: external
  internal:
    image:
      repository: goharbor/redis-photon
      tag: v2.0.0
    # resources:
    #  requests:
    #    memory: 256Mi
    #    cpu: 100m
    nodeSelector: {}
    tolerations: []
    affinity: {}
  external:
    host: "xxx.redis.singapore.rds.aliyuncs.com(外部Redis Host)"
    port: "6379"
    # The "coreDatabaseIndex" must be "0" as the library Harbor
    # used doesn't support configuring it
    coreDatabaseIndex: "0"
    jobserviceDatabaseIndex: "1"
    registryDatabaseIndex: "2"
    chartmuseumDatabaseIndex: "3"
    clairAdapterIndex: "4"
    trivyAdapterIndex: "5"
    password: "外部Redis密码"
  ## Additional deployment annotations
  podAnnotations: {}
使用 Helm 进行安装
这一步使用 Helm 将刚修改好的 Harbor Chart 安装到集群中:
helm install devops-hb .
devops-hb 为设置的软件包名称,会体现在 Deployment 和 Service 等名称上。通过 kubectl 查询容器情况:
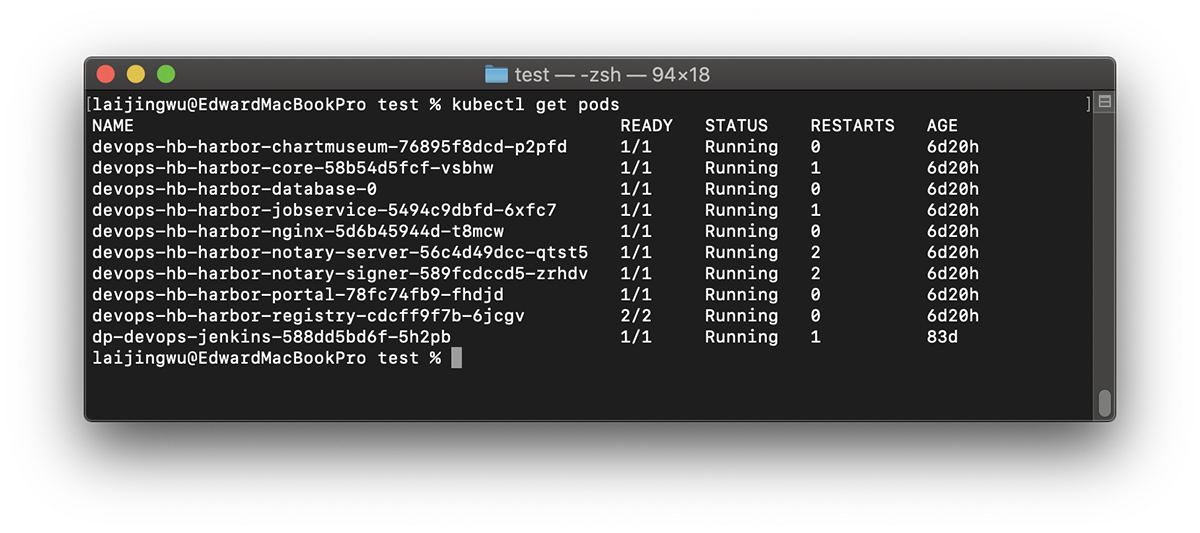
各个组件启动成功,也可以查看各个 Deployment, Service, Persistence Volume 等资源状态。需要注意的是,由于 harbor-database 为 Statefulset, 需要较长时间初始化,会使得部分依赖其服务的组件在启动后出现 CrashLoopBackOff 的情况。
Let’s Harbor
查看一下对应 Service 的情况:
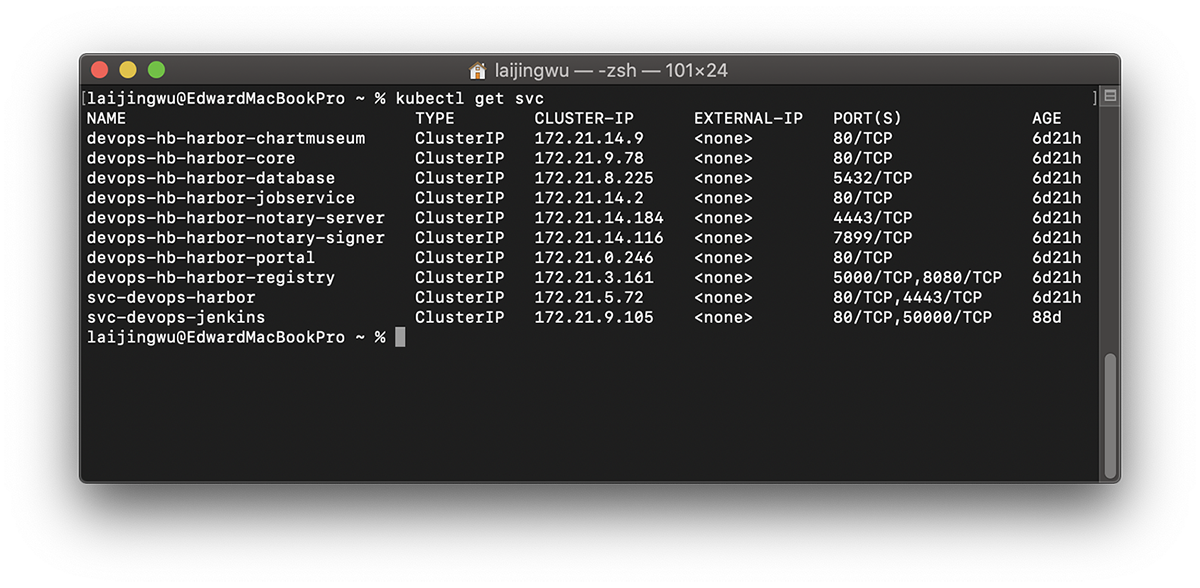
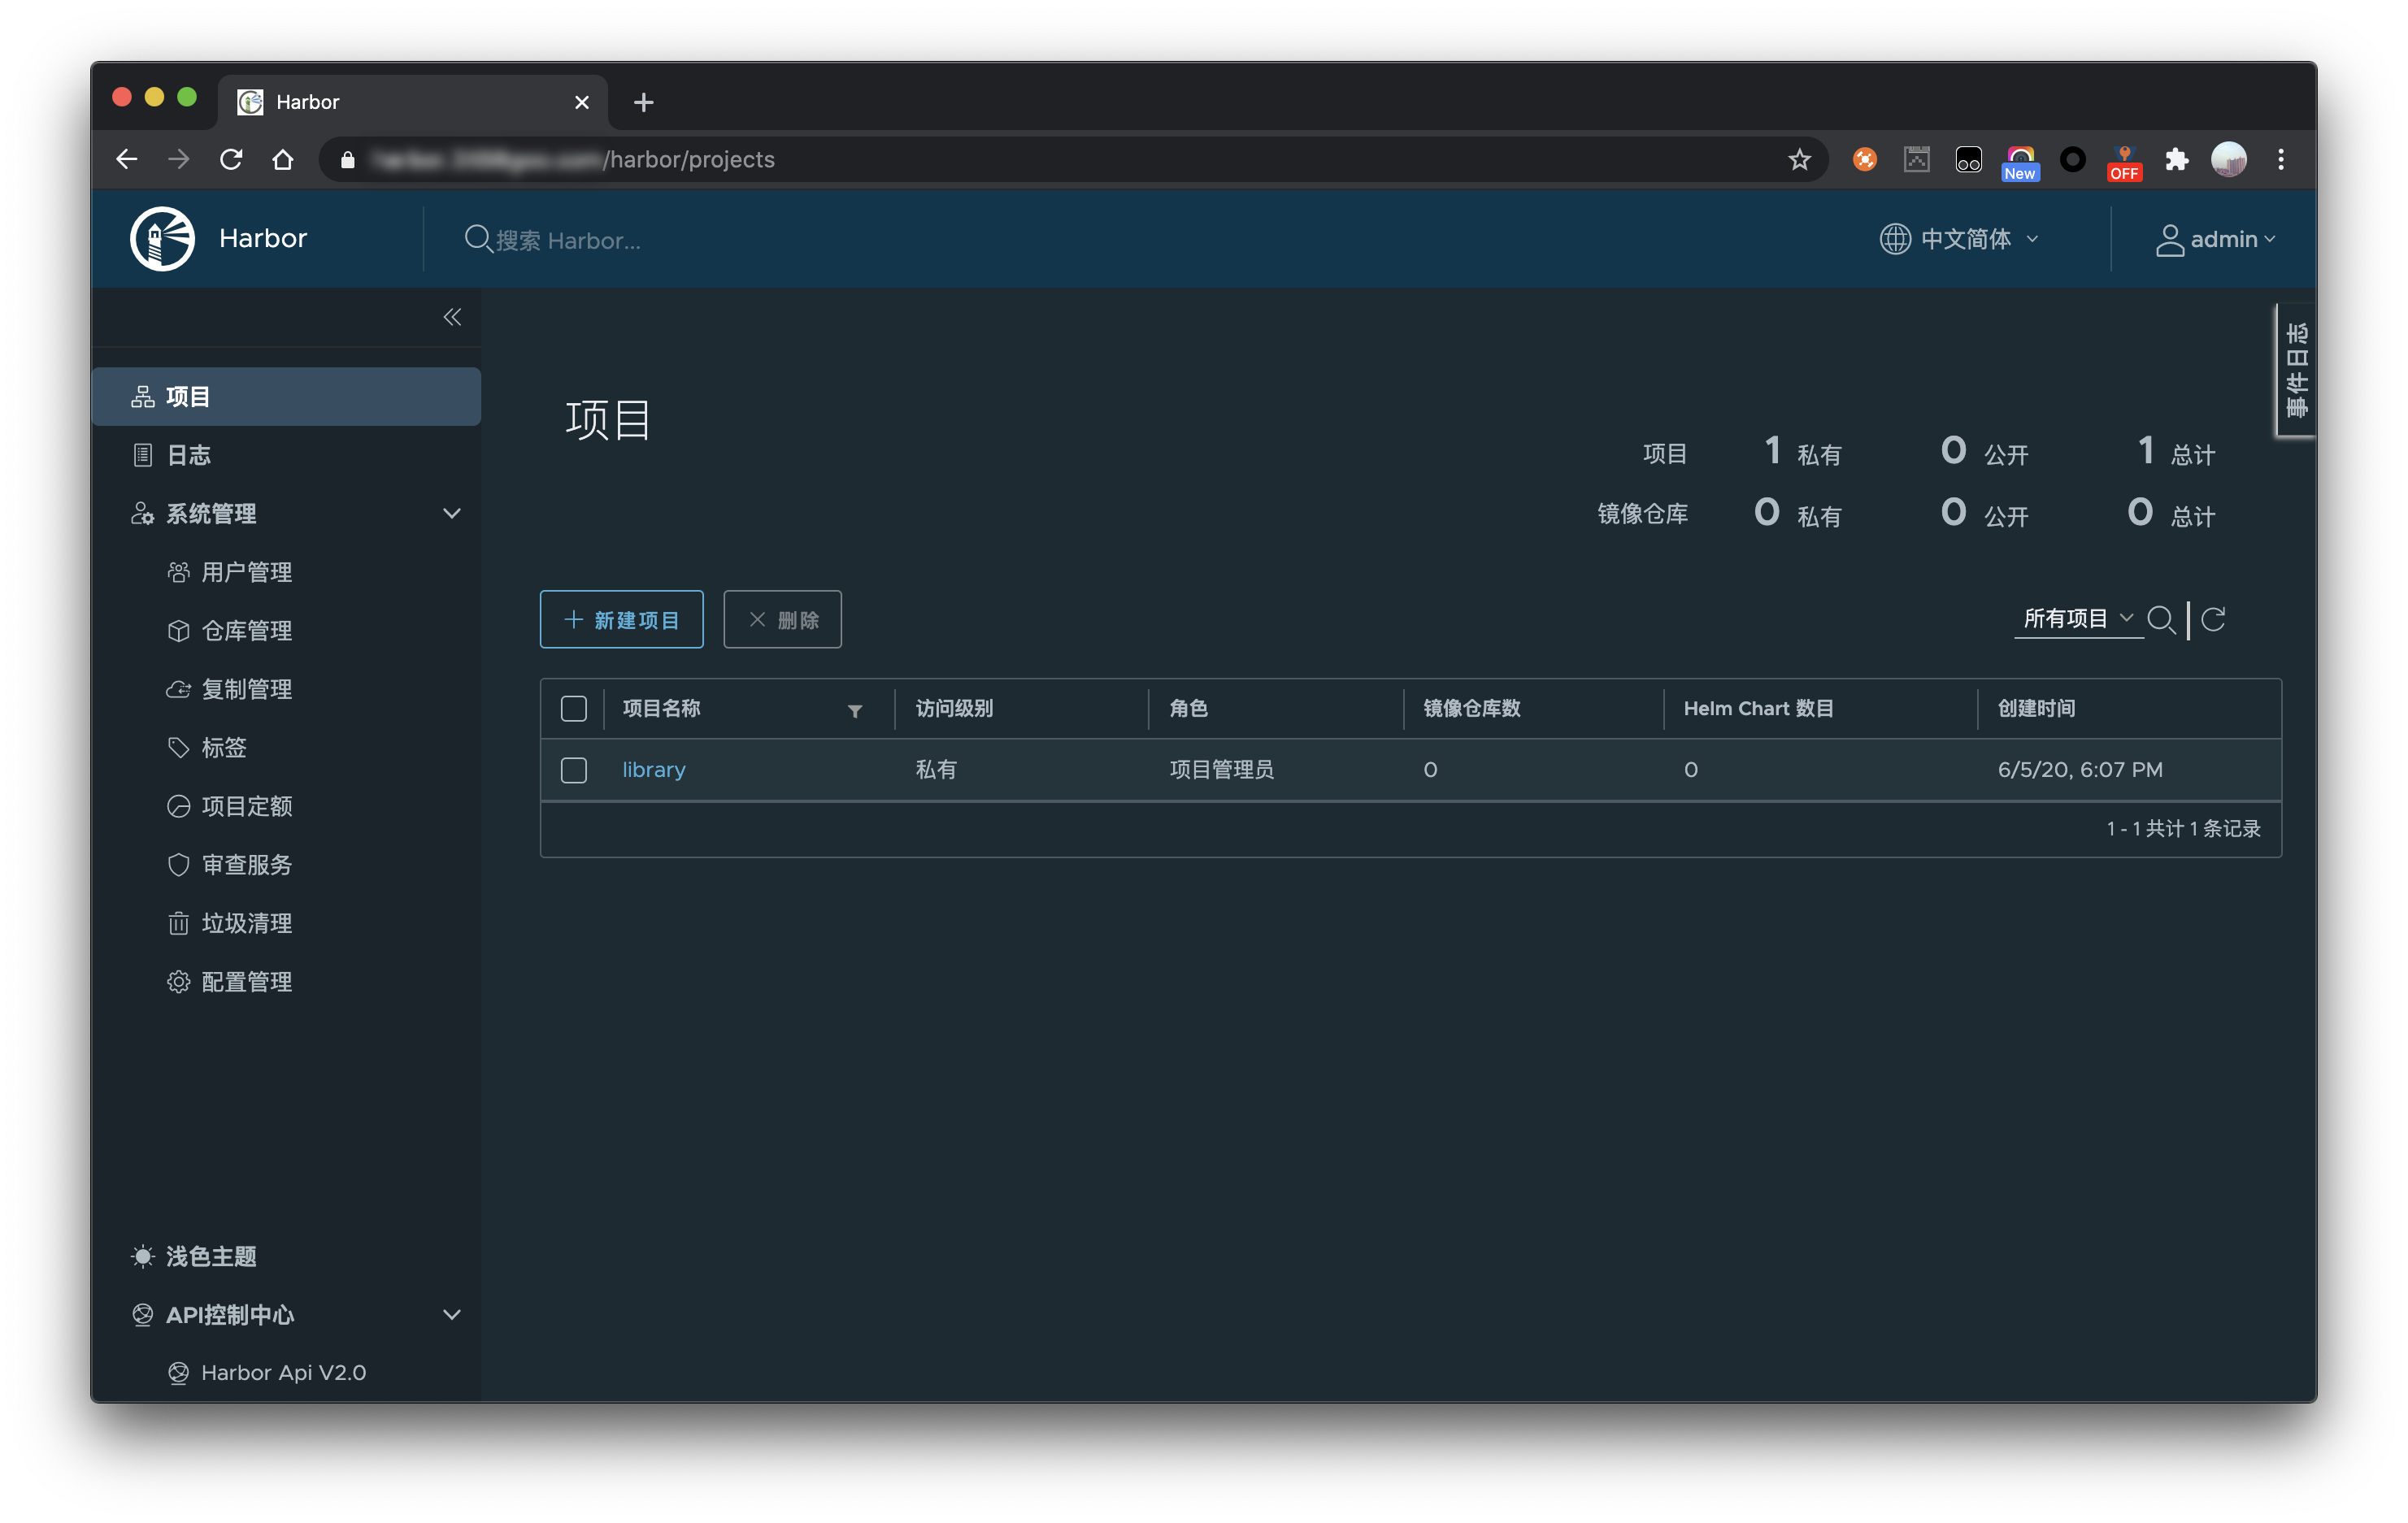
根据 harbor 的端口暴露可以得知,Harbor 在集群中的 Service 已经创建好了,端口是 80 和 4443(notary)。因为之前我们已经配置 Ingress TLS 和将 harbor.test.com 转发代理了 Harbor 的 80 端口,故使用 https://harbor.test.com/ 进入 Harbor Portal,输入 values 中预先定义好的账号(admin)和密码(Harbor12345)即可登录。
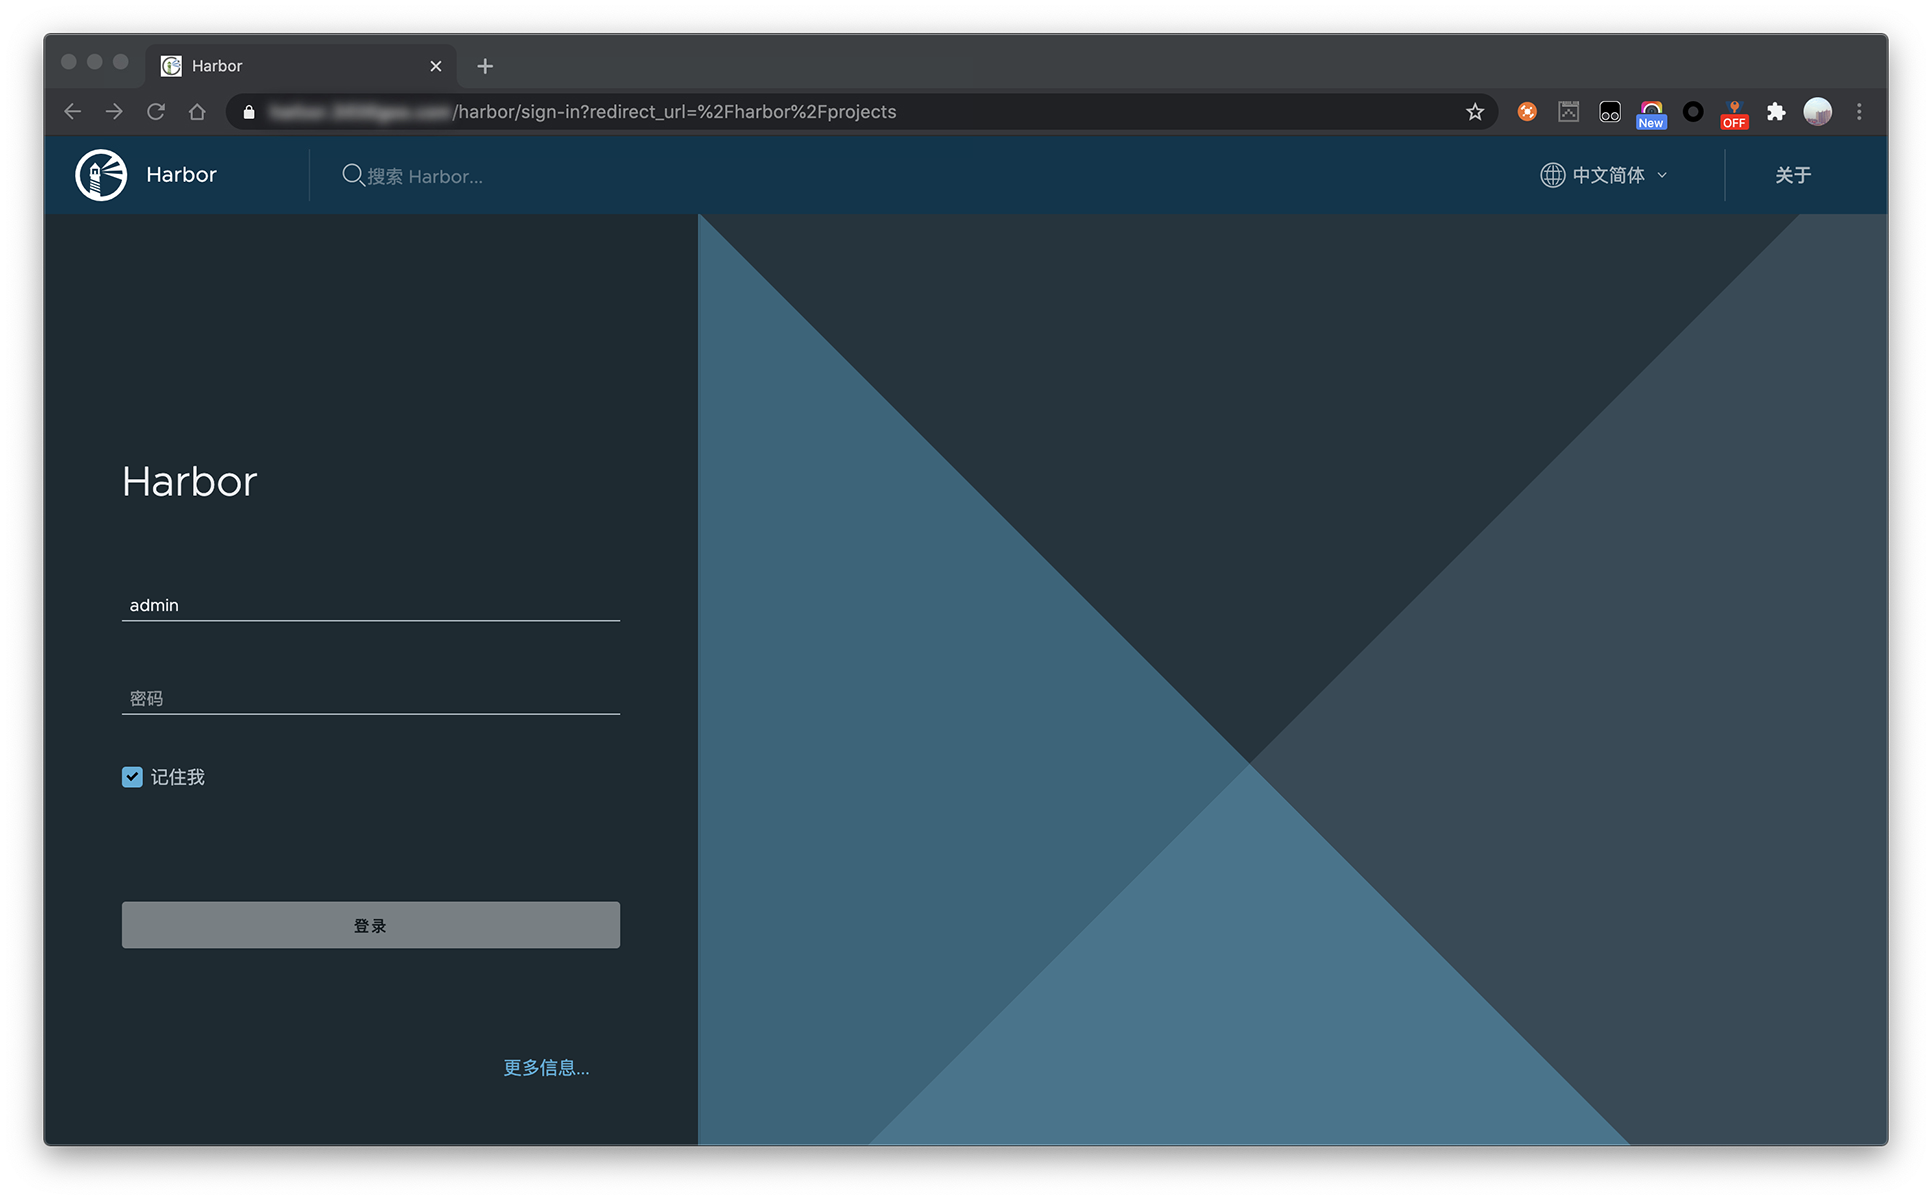
Harbor 的 GUI 管理界面还有诸多的功能,例如:镜像扫描、日志审计等,可以根据需要进行探索。
尝试使用 Docker Cli 推送镜像
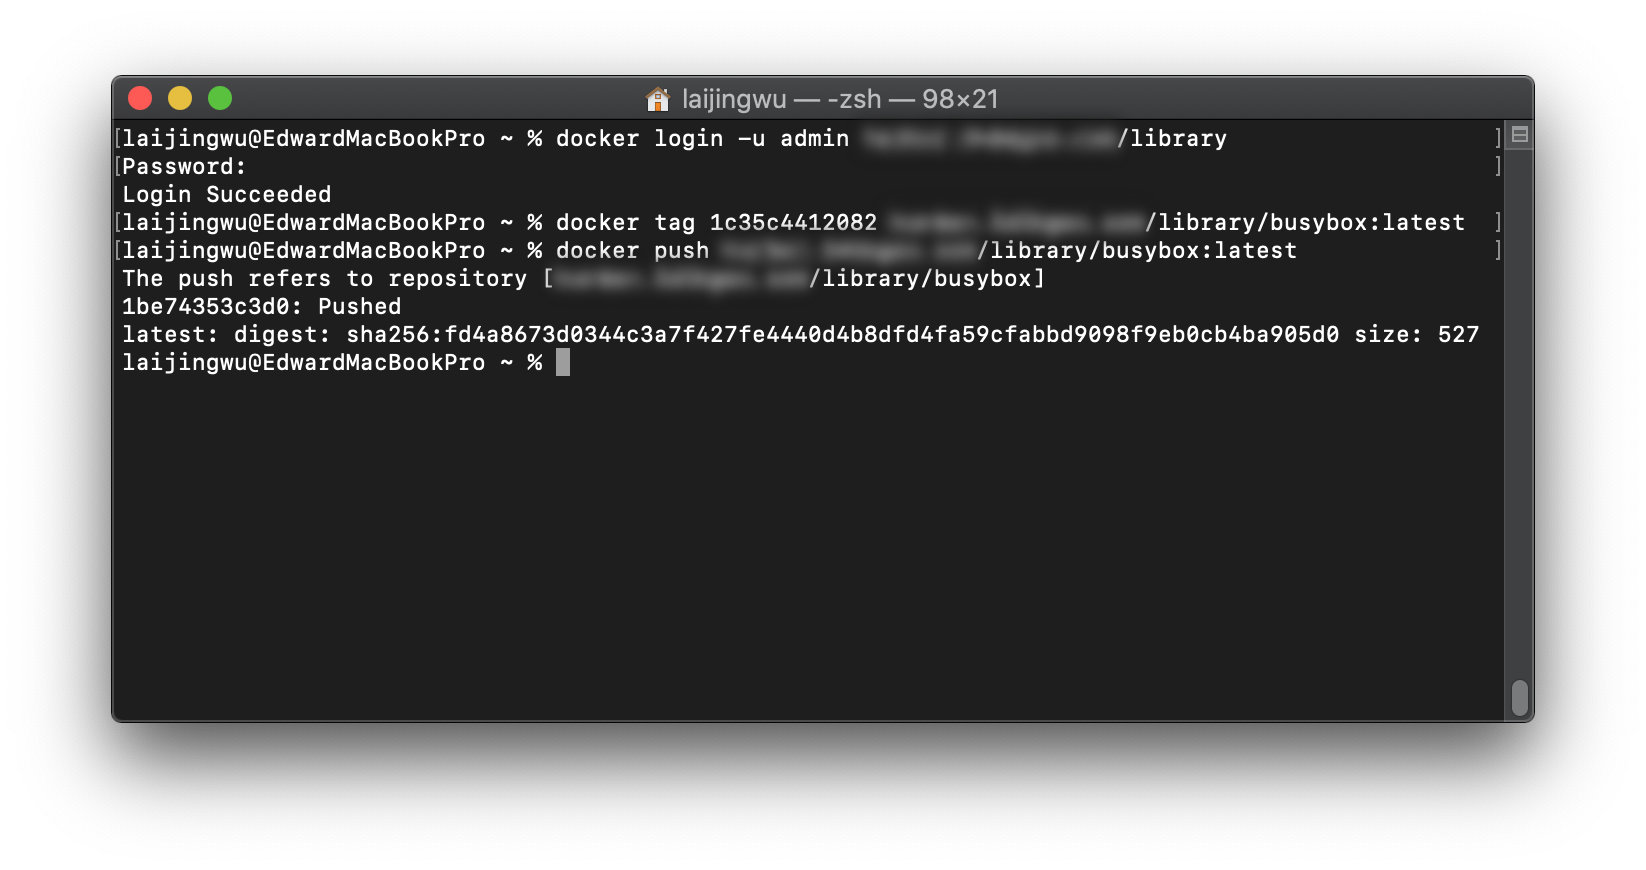
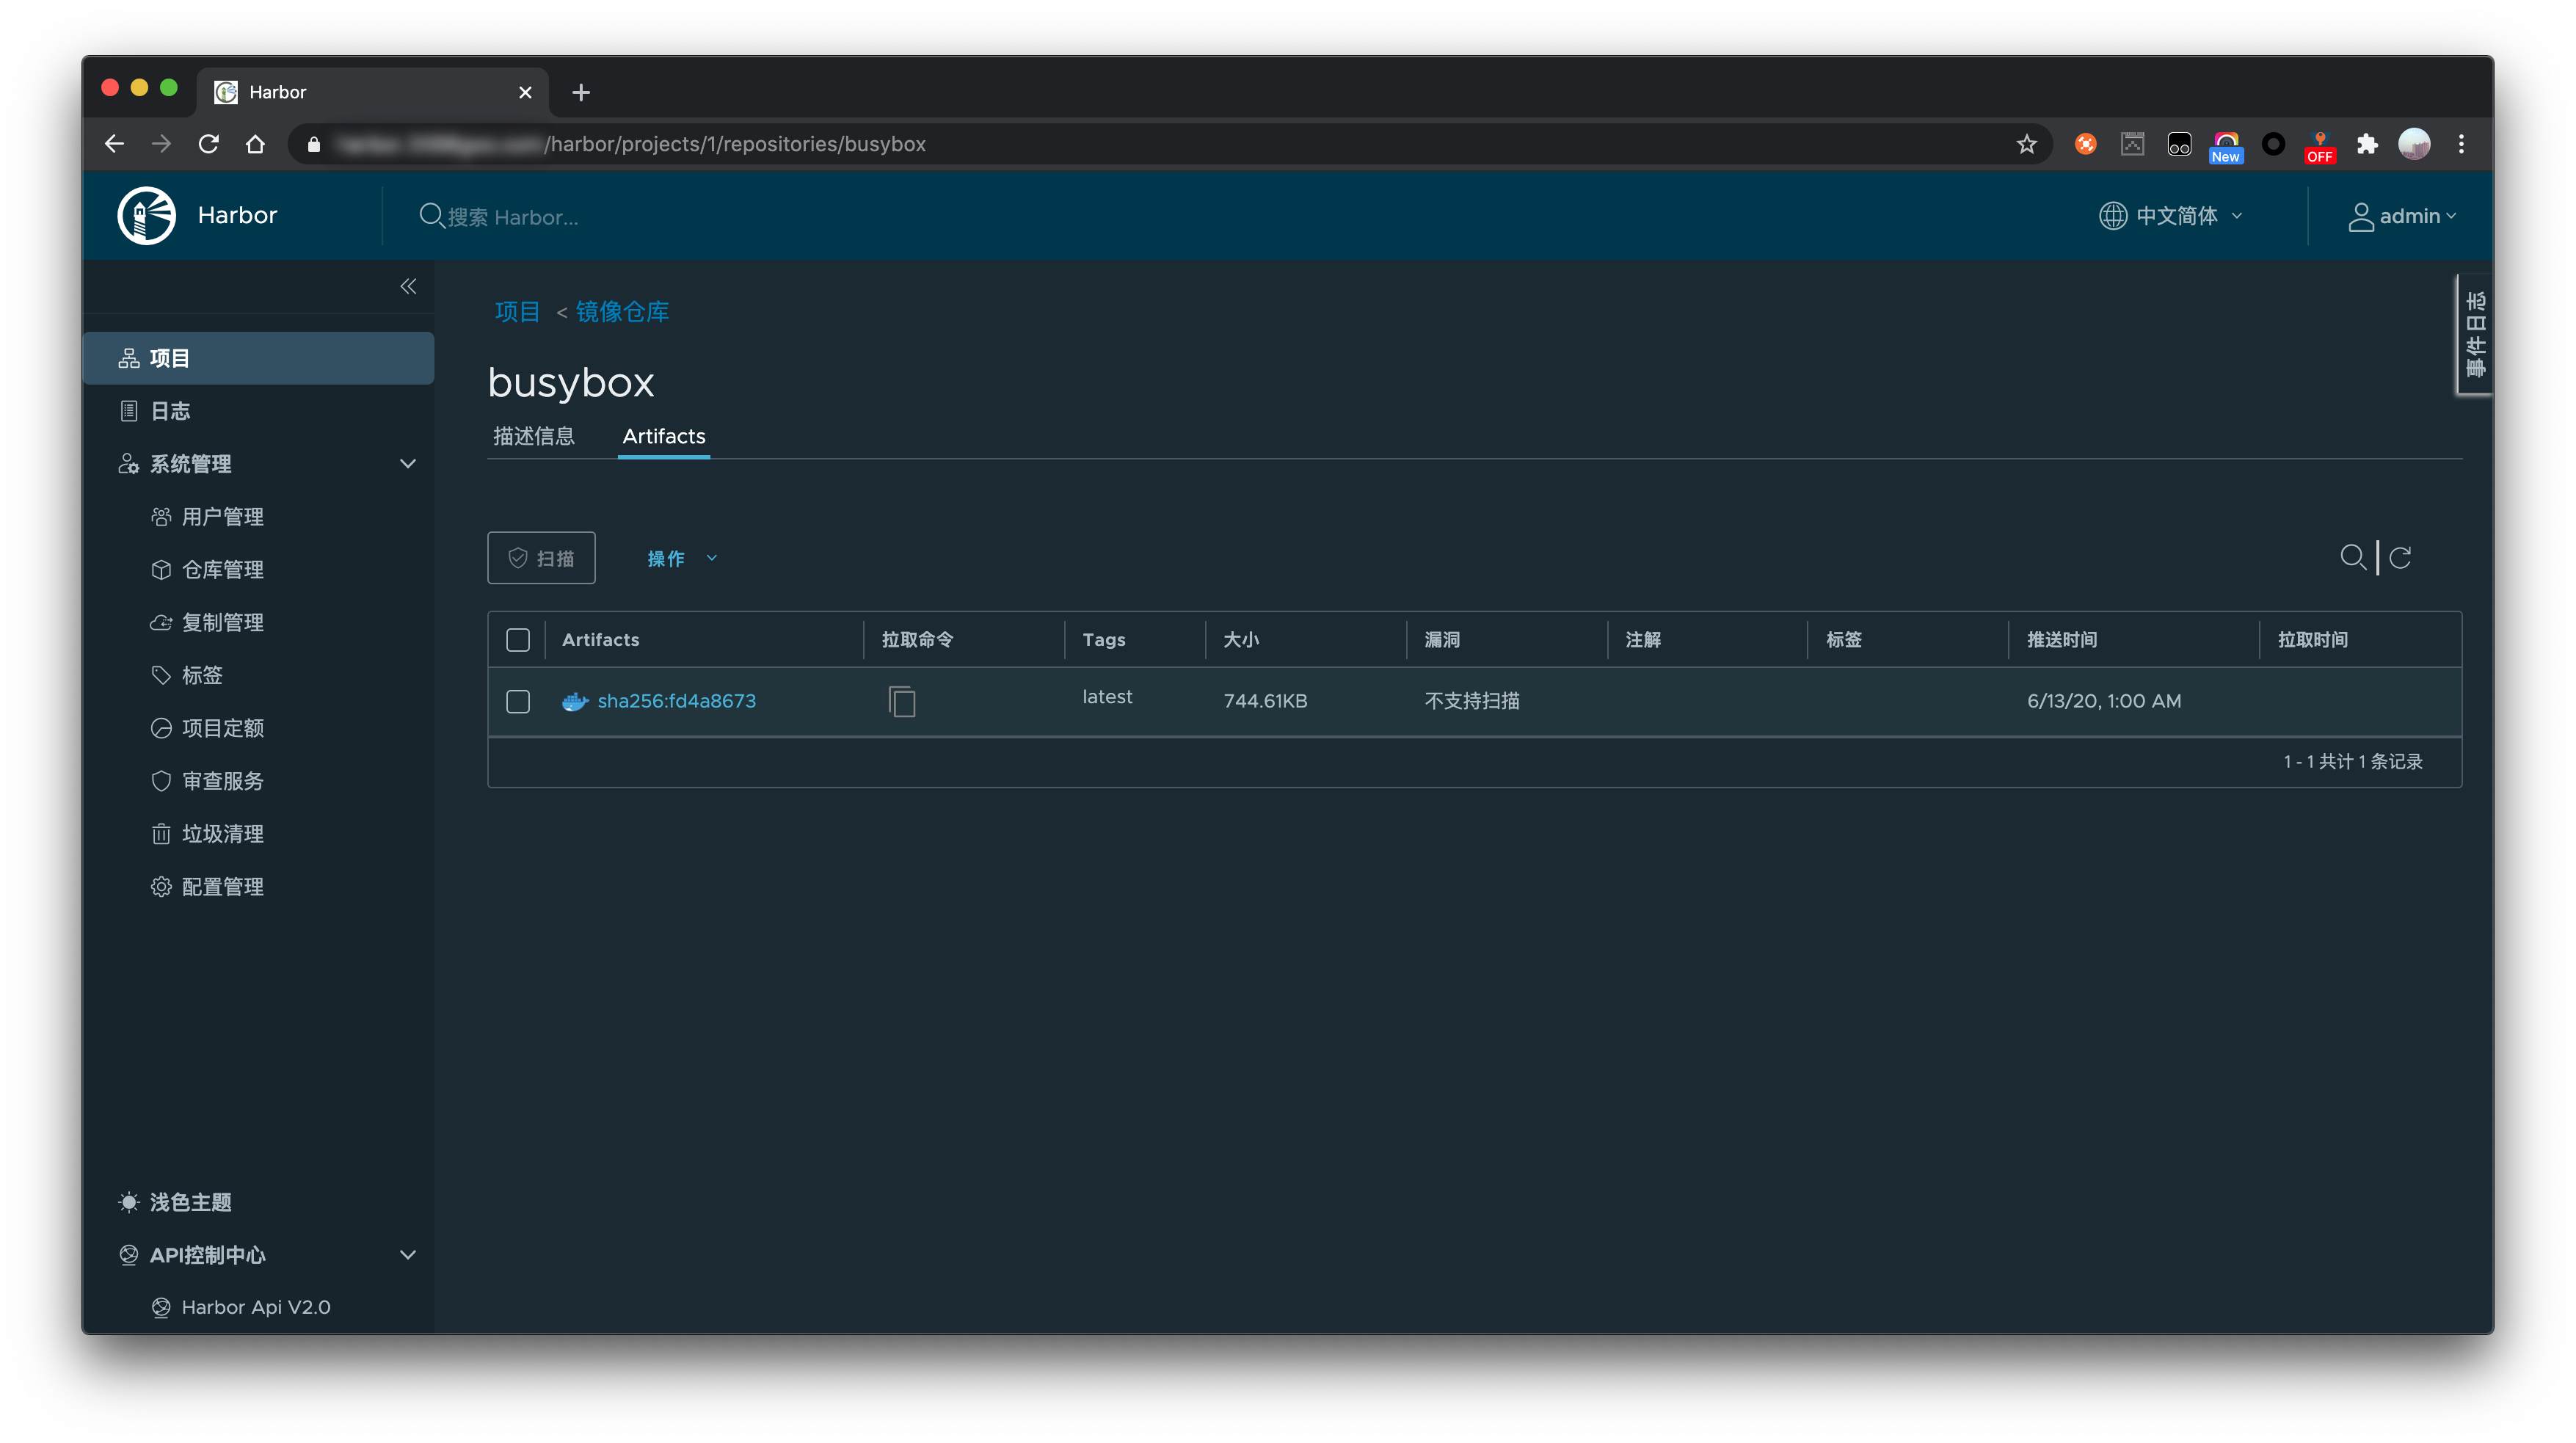
到这里证明上面我们的私有 Docker 镜像仓库搭建成功了,可以 pull/push 镜像,Harbor 还具有其他的一些功能,比如镜像复制,可以根据需要探索。
尝试使用 Helm 推送 Helm Charts
用于测试推送的 Chart 是使用 Helm 新创建的。上传之前需要安装 Helm Push 插件。
$ helm plugin install https://github.com/chartmuseum/helm-push
Downloading and installing helm-push v0.8.1 ...
https://github.com/chartmuseum/helm-push/releases/download/v0.8.1/helm-push_0.8.1_darwin_amd64.tar.gz
Installed plugin: push
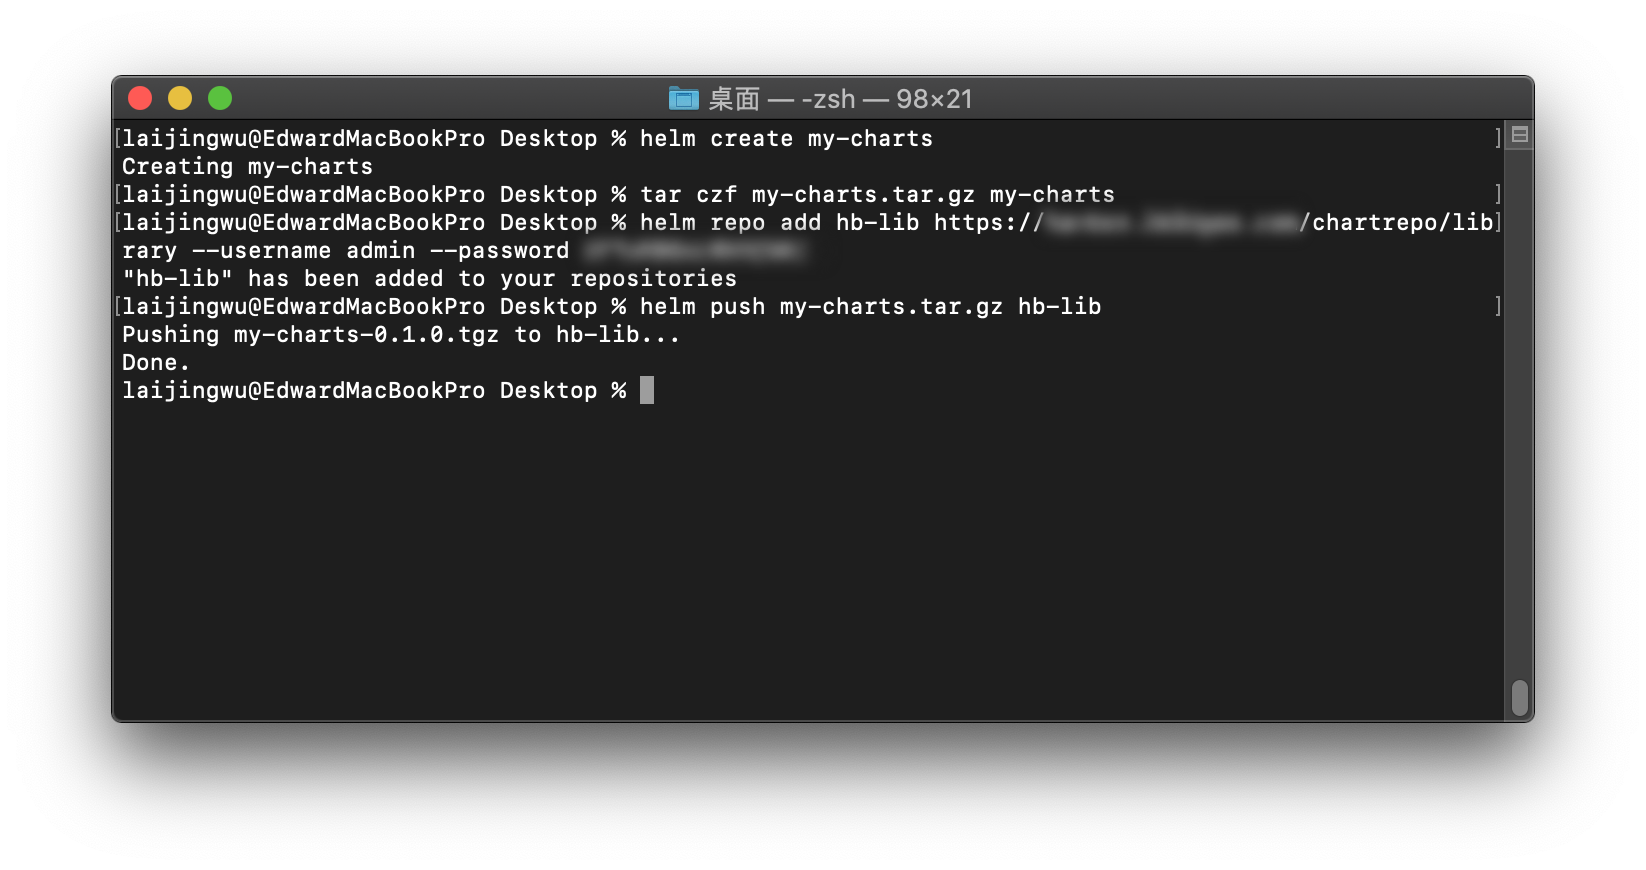
可以看到用于测试推送的 Chart 是使用 Helm 新创建的,推送前还需要添加私有 Helm Chart Repo 到本地。
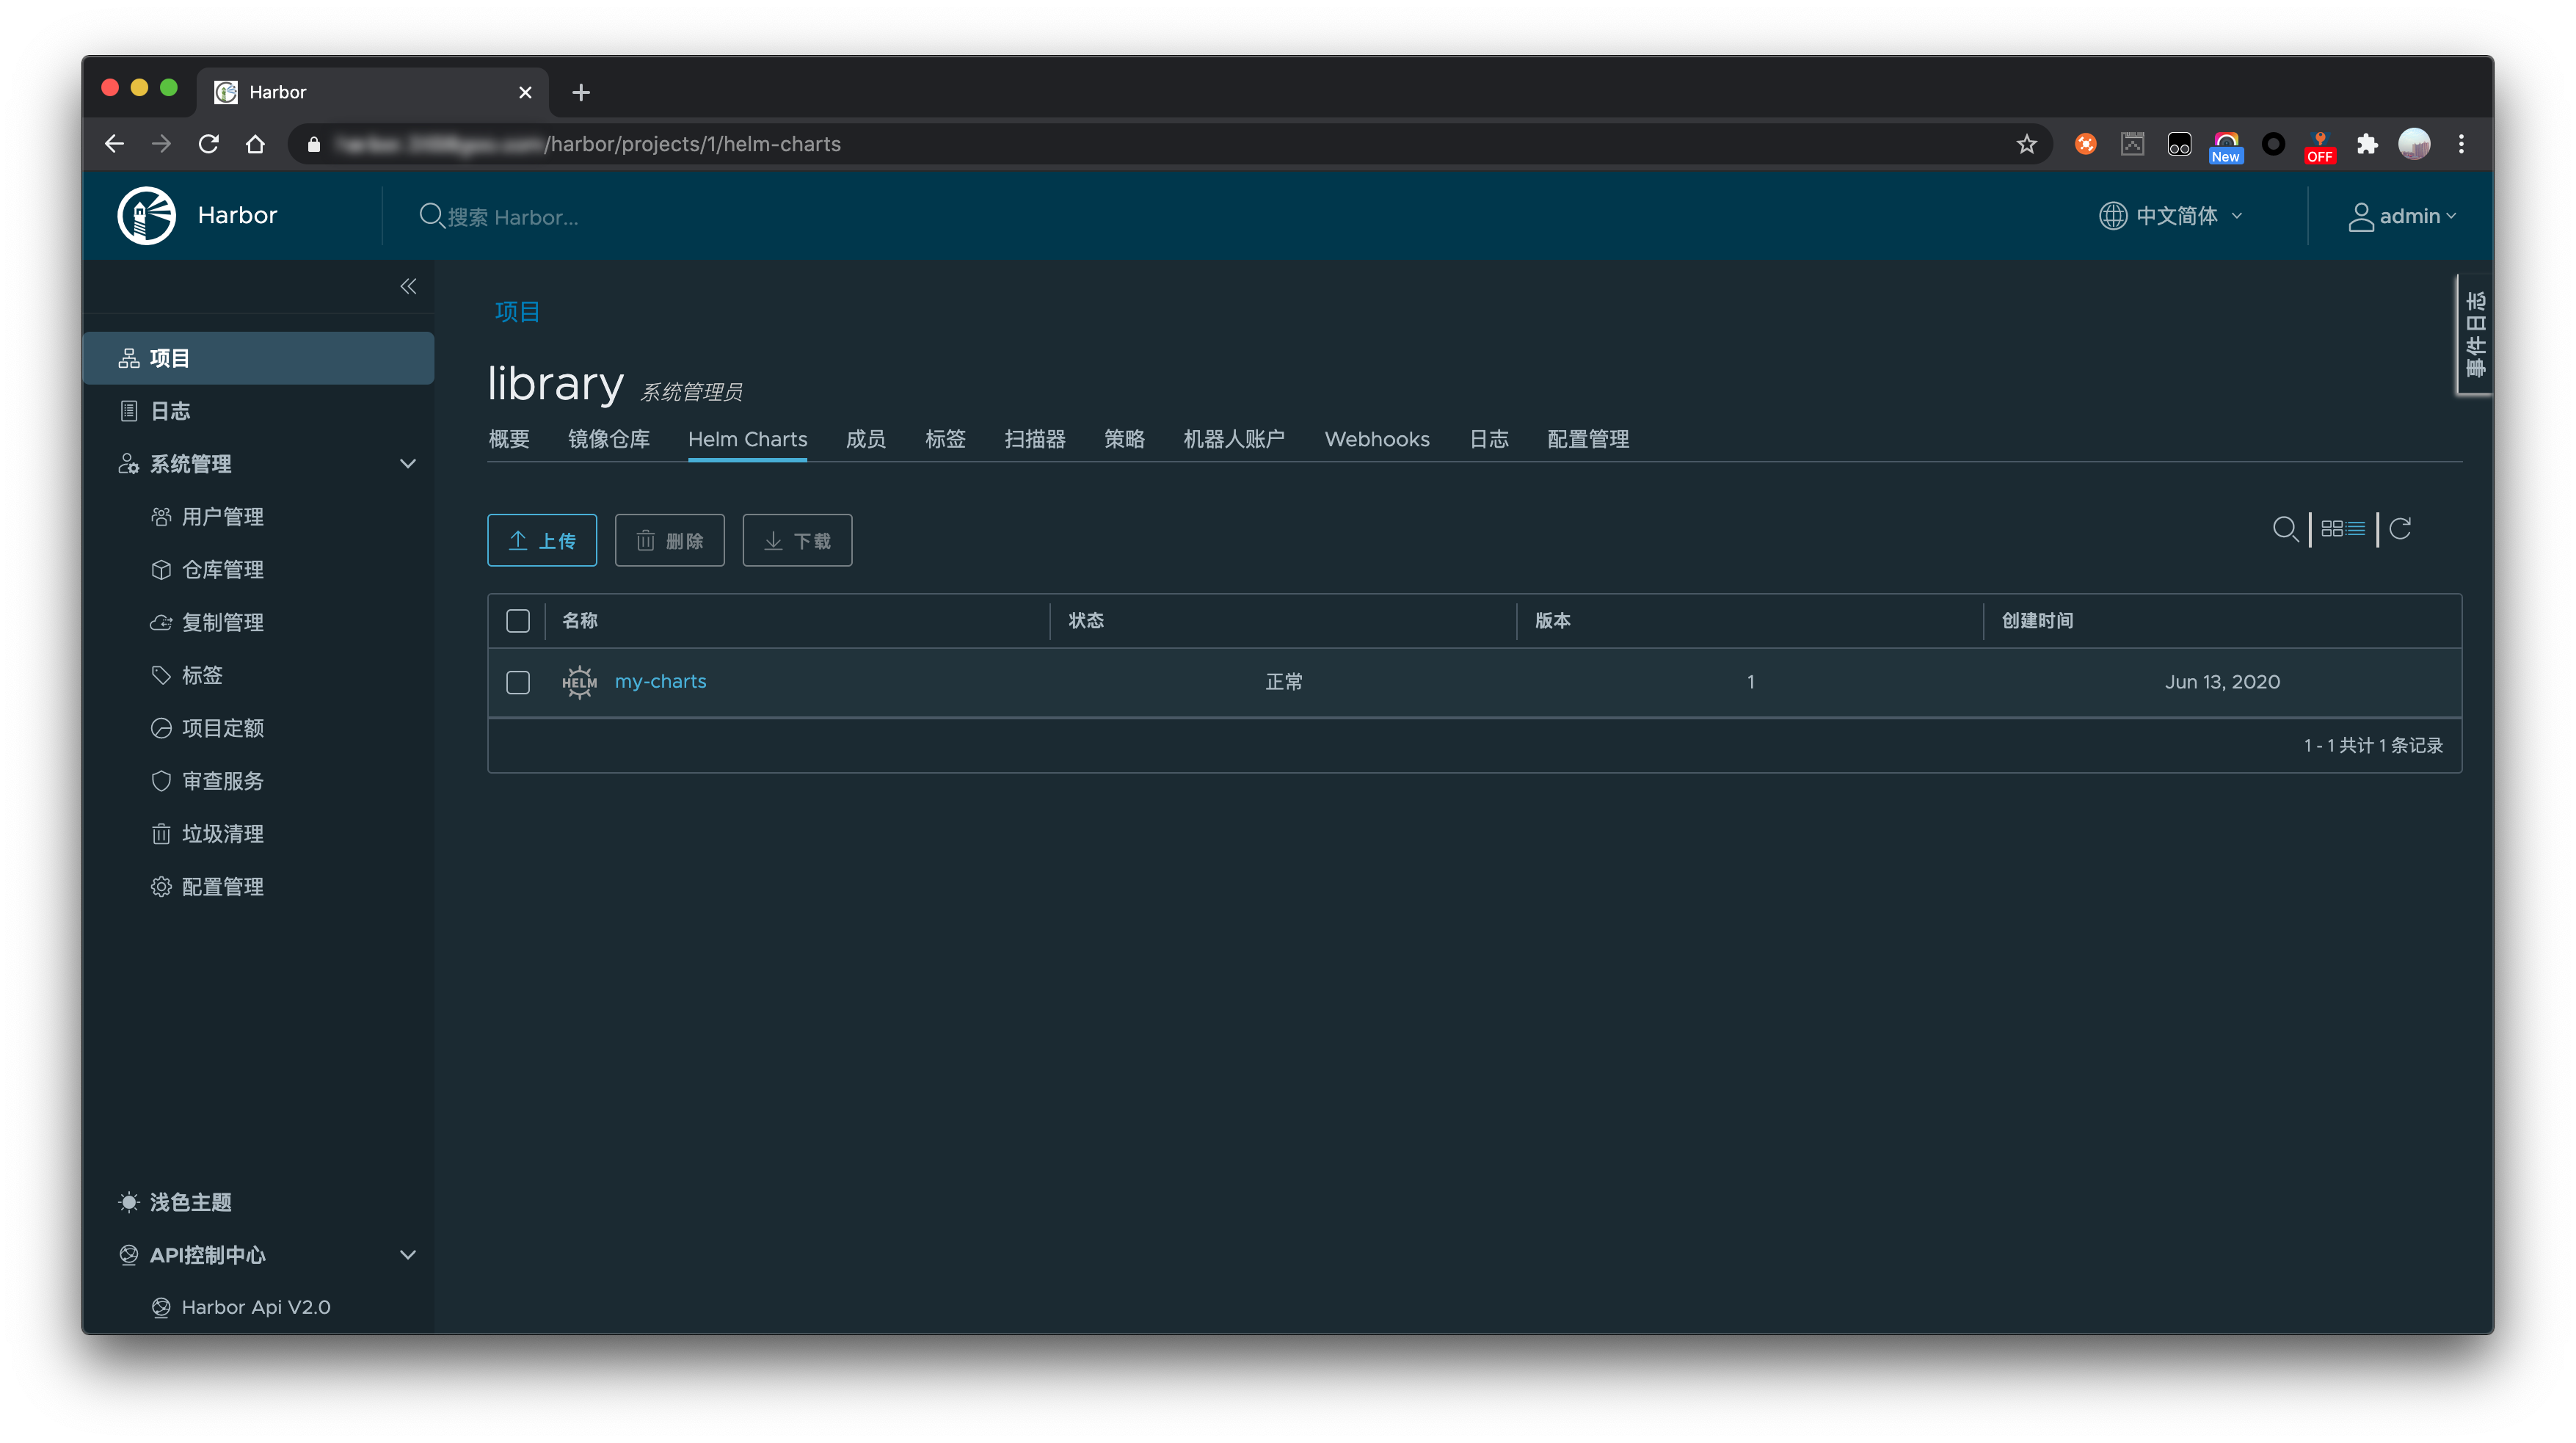
到这里证明上面我们的私有 Chart Museum 镜像仓库搭建成功了,可以 pull/push Helm Charts。
